Showing posts with label organizational tips. Show all posts
http://theelementaryentourage.blogspot.com/2015/01/happy-new-year-from-learning-chambers.html

Today is my day to share some organizational ideas on the Elementary Entourage Blog.  Here is a sneak peek of what I'm sharing.


Trust me, you don't want to miss it.  Click on the blog button below to read my post.

http://theelementaryentourage.blogspot.com/2015/01/happy-new-year-from-learning-chambers.html


I really hope you have enjoyed this guest blogger week as much as I have.  I loved reading all of the tips and tricks from each of the different bloggers!  Aren't they all fabulous?  I know that they loved sharing with you guys.

Now, it is your turn to share!  Please share a post with your favorite organizational tip or pin.  Or, maybe you could share a fun app that would be helpful or something that you made to help organize your classroom.  Anything organizational for this linky goes!  Make sure you click below and link up your blog post.  I can't wait to read all of your posts!

P.S. Since I'm busy moving today, I probably won't read your posts till tomorrow.  Although, I could use a good excuse to relax and not move!

An InLinkz Link-up
Hi!  We are BURSTING with excitement to be guest blogging for Stephanie during her "Moving and Organization Week!" Make sure you follow her blog!  She has some terrific ideas!!!


We are Karen & Alison from Planet Happy Smiles. Please go visit our blog after you have investigated all the great organizing tips....and follow us, too!

 
We have so much to share with you! We have both been moved grade levels in our careers.  It can be kind of scary!  OK, TERRIFYING!  Here are some tips for an organized and successful year!


Planning your room can seem overwhelming!  We like to just go and sit in our new room and sketch.  We then make a "to do" list & include everything we need to get done to start the year off right.  If you can divide and conquer with your team, that is the BEST!  If not, make your list and stick with it.  You will find that more will be added to your list as you go, but remember … you can do it! There will be a freebie at the end of this blog that includes a variety of different styles of “To Do” lists!
Grab this freebie at the bottom!


Our next tip is find and organize a spot for every item!  As teachers we collect a ton of different items.  Make sure every item has a place.  We recycle as much as possible.  When ever you are about to pitch a plastic container, think "Can this item be used to store small objects?"  One of those we have used often are the Lysol containers. They are great and come in 2 different sizes.  We even made a cute label to match our room.  Yes, we have bought more than our share of plastic storage from a variety of vendors, but we love to recycle, too!


Once everything has a place and is arranged the way you like it, label it!  Your kids will know that everything has a place once you label it and they are more likely to put it back where you want them to. Yes, you will need a "Missing Pieces" container because there are always small things that just don't make it in the game box or container.  Most of your items will! Here are some pictures of things we have labeled around our room and it helps a ton!!!  


If you haven't made a teacher tool box ... Oh, baby!  They ROCK!!!
That is one item you have to have!!!
Here is a pic of one of ours, we have the 39 drawer and the 22!

This is one we made for our home office!


Our last tip is on room design. Making your room look cohesive is very important to your learners, parents, and admin.  Planning, purchasing, and setting it up can be quite time consuming.  One way to save time is to buy your décor in bundles!  No more wasting time on the computer or in stores shopping around for each piece.  You can now find items all in one!  You can even find supplemental items in the same store that may match!  It is a win-win!  So far we have 6 bundles in our store, but more are coming!


Here is a list of the items we offer in our bundles.  They are 500+ pages of fun:

1. Complete Calendar/Weather set (22 pgs)
2. Helper Jobs – 63 different jobs and header (15
pgs)
3. Classroom hall passes – 12 different passes (12
pgs)
4. Word Wall Alphabet Cards – large (13
pgs)
5. Word Wall Headers &150 S.W. cards (32
pgs)
6. Sight word cards (editable) (1
pg)
7. Welcome banner (9
pgs)
8. Desk name tags (6
pgs)
9. Wall name plates to display work (7
pgs)
10. Skill banners (8
pgs)
11. Learning Objectives posters (editable) (9
pgs)
12. Note cards (editable) – different sizes (7
pgs)
13. Newsletter (editable) (8
pgs)
14. Getting to know you form (editable) (1
pg)
15. Rules, Rewards, Consequences posters (8
pgs)
16. Helper/Reader sign up sheets (4
pgs)
17. Birthday chart (editable) (2
pgs)
18. Yes/No Graph (editable) (24
pgs)
19. Sharp/
Unsharp Pencils signs (2 pgs)
20. Behavior Clip Chart (20
pgs)
21. Table Colors/Numbers (12
pgs)
22. Toolbox Organization Labels (editable) (4
pgs)
23. Tote tray Supply labels (16
pgs)
24. Stars & Wishes Class donations (editable) (19
pgs)
25. U.S./Texas Pledge posters (4
pgs)
26. Centers/Stations signs (173
pgs)
27. Schedule cards (29
pgs)
28. Homework Club (5
pgs)
29. Parent Communication Log (editable) (5
pgs)
30. NOISE! Posters (3
pgs)
31. Number Wall/Cards (20
pgs)
32. Alphabet cards (14
pgs)
33. Student Binder Cover & Spine (editable) (2
pgs)


Have a bundle in mind and need us to create it, please email us @ planethappysmiles@gmail.com


Thank you so much to Stephanie for allowing us to be a guest blogger and thank you for making it to the bottom!  Please come visit our site now and follow us for more fun and freebies!
Happy Organizing!


Hi guys. My name is Ashley and I am super excited to be a guest blogger this week. I am taking sometime off from my own blog, Anchored in Learning, to help Stephanie out during her move. Before I locked down a tenured track position in my current district I spent some time bouncing around as a long-term maternity leave substitute. This gave me insight into how others organize and manage their classrooms. In the primary grades there are many small math manipulatives that can easily be lost or broken. I have seen these manipulatives organized and disorganized many ways. This week I want to spend some time discussing helpful tips for organizing Guided Math centers and manipulatives.
One of the most helpful things you can do to keep things clean and organize is to involve your students. Let them take ownership and responsibility over their materials.  I know, I know, easier said than done. My students would be lost without picture labels. Label all of your bins with pictures and words so the students know how and where to put things away. A quick search on Teachers Pay Teachers will lead you to many free or cheap labels. Next organizational tip... Math Bags. Each of my student has a Math Bag(Zip Bag or Manila Envelope) to store their materials and a small check sheet to so they know what supplies should be in there. If they discover something is missing they can go over to the labeled supply bins and retrieve what they need. When it is time for independent practice or Guided Math Centers the students take their Math Bags out and can get straight to work without wasting instructional time passing out supplies.  In the beginning of the year I involve the students in the distribution of the math materials. I split the students up into teams and then have them sort the counting cubes by color and then into towers of 10.Each student selects a tower of 10 to add to their Math Bag and the rest get stored by color in Freezer Zip Bags for the future. The students also add dice, counting chips, a spinner, shape blocks, and of course a pencil to their Math Bags.
This is a great team building exercise because students attack the challenge differently. Sometimes each student picks a color or object to sort by , sometimes they sort altogether, and yes sometimes they argue and require some conflict resolution. Either way you get a glimpse at how the students work in groups. Now that all of your manipulative are organized for the year it's time to start introducing your Guided Math Centers.  If you are unfamiliar with Guided Math Centers or Math Workshop there are a million great resources out there that explain different ways to get started.  Like many others I use the acronym B.U.I.L.D. for my Math Centers. BUILD stands for... 
B.U.I.L.D Guided Math Signs
  • Buddy Games, 
  • Using Manipulatives, 
  • Independent Practice, 
  • Learning with Technology, 
  • Doing Math with the Teacher.  
Each center corresponds with a different cloth bin housing all the activities needed for that week. If the students are at the Buddy Game center they take the "B" bin  and can get started playing Buddy Games that correspond with the chapter we are focusing on. When it is time to switch centers, all the materials go back into the appropriate bin so that the next group will be ready to go. Click the link below to grab your own copy of my B.U.I.L.D. labels. I Love Freebies
I will be posting more information about Guided Math centers throughout the summer so please stop by my blog for more information. Thanks, Ashley
AnchoredinLearning


Hey y’all! I am so pleased to be a guest blogger for Stephanie at The Learning Chambers.  I shared with Stephanie recently that I had moved my classroom a few years back and then also last summer. Hopefully this post will give you some ideas for organizing your move- whether it’s happening right now or in the near future! You never know!

Let me give you a little background first! I am the STEM Lab teacher for grades 3-5 in a northern Alabama school. This job was an inspiration from my fabulous principal. She casually mentioned it one day in 2013 and I pursued it. I had taught third grade for 17 years and felt it was time for a change. It has been an amazing journey! I see every class in the school once a week for an hour. The STEM projects and activities have been such a great learning tool. The biggest challenge for me, though,  was shutting down a third grade classroom and setting up a lab!

My plan for this post is to show you some photos and talk especially about things I know worked for me. I also have the move from a few years ago to think about in helping you with your move. (Our move a few years ago involved our entire school! We all moved out of a building that was then torn down. We were housed in a temporary location for an entire school year, and then we moved into a new building!) 

So, let’s get to moving!

The first thing I had to do to get moved was clear out my third grade classroom!

 photo 1button_zpsb14898cc.png

 Helpful Hints I Can Give You:
You need boxes! You need boxes that you can get your arms around when lifting. That means something small enough to hold things, but not so large the box gets too heavy. The perfect box is the one that reams of paper come in. Try asking Staples or Office Depot to save those for you!

   Have a plan for cleaning out! Set up about 6 boxes and label them. I had these areas to start with: Things to Take Home, Things to Move to the New Room, and the Trash Can. I put a couple of boxes in each area. Those boxes were then labeled more specifically.

Place items in those boxes logically. Think about unpacking as you go! What should go in the same box as construction paper? What should go with office supplies? Here’s a great tip from the BIG move our entire school did a few years ago. As I packed I numbered each box. Then before I taped the boxes up I made a list of what was in each box. I kept those lists in a notebook that I referred to often as I unpacked. It was a massive list, but when we arrived at our temporary building we didn't have room to unpack everything. About half my boxes were stored in a nearby closet and I would use my lists to know which numbered box to find when I needed something! Keep an inventory list!

  CLEAN OUT! This is the perfect time to get rid of stuff. You know they say if you have not worn something for over a year, you should get rid of it. Well, this same theory works with packing up your classroom! If you have never used it, throw it away. If you can’t remember the last time you used it, throw it away. If you used it and didn’t like it, then why did you save it? Throw it away. It goes against every fiber of our little teacher bodies, but throw stuff away.

    Think about what you will need when you get to your new space! As you are packing have one special box that is just for things like a hammer, nails, string, glue, scissors, hooks, Velcro, tape, staples and stapler…. All those things you will need as you are trying to get going in your new space. You can waste a lot of time looking for staples when you need them!

Time! This is going to take time y’all. If you don’t give yourself a good time frame to work in for packing everything up here’s what will happen. You will just start throwing things in boxes with no plan and later you will not be able to find anything. It took me at least three full days to get my room to look 
like this:

 photo 2button_zps9f06e018.png  


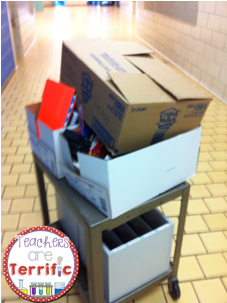
Get a cart!  Your school probably has some kind of rolling cart you can use to get your things from one place to another. It will save your back and muscles (or your significant others's) to use a cart.
Here's the one I used a lot as I traveled from my third grade class to the Science Lab:

 photo 3button_zps8574741b.png


Alright, now let’s think about what to do when you get to your new space!

Look around. It seems silly at first, but you have to get a feel for your new space. What is the traffic flow going to be? Where will you place your desk? What about your reading nooks, guided reading table, math center, carpet and easel, and all those other things we use? Just stand in your room and plan it out. Sketch it! It will help you decide where to place things.

   Prioritize! When I walked into the Science lab I probably stood for a good thirty minutes just looking at all the cabinets and trying to decide where to start. I decided I would start with my own personal space. I have heard that when you move into a new house you should always get the kitchen ready first. That’s the heart of the home and you will feel better when it is operating! So, I made my personal corner cozy first.

 photo 4button_zps0c26a670.png  

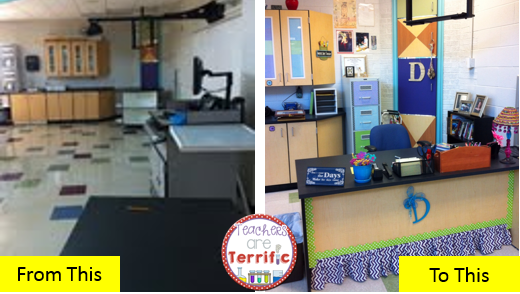
 The added benefit is that this made me unpack the box I had labeled as essentials. This gave me easy access to all those tools and goodies I would need to start decorating!

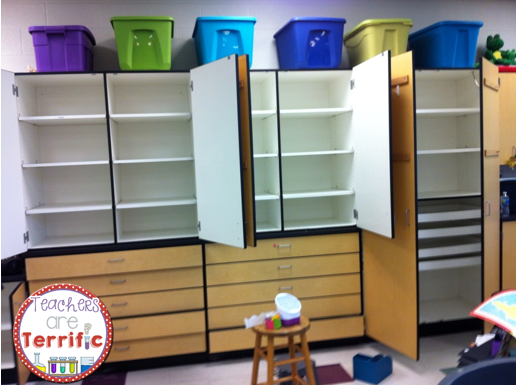
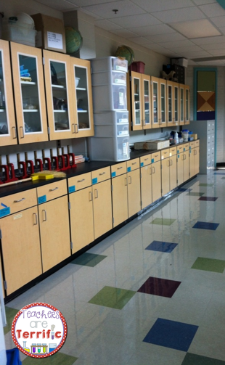
        CLEAN! It’s sad, but you might have to clean before moving your stuff into the new space. The condition of the inside of cabinets and shelves may surprise you. Bring some rubber gloves and 409 spray and clean it. You will feel better moving your things into a nice place.
Here's what I found when I was ready to tackle the lab shelves and cabinets (notice the clutter on the counter tops and on top of the cabinets): 

 photo dd006c09-e08b-4cac-a45e-43f017366bb5_zps9ff29af0.png


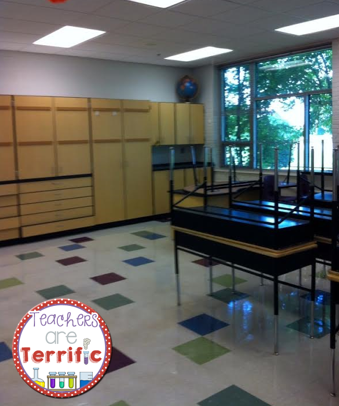
     What about the OLD STUFF in the ROOM! Sometimes we move into a space that is full of things that were left behind. I suggest you go through those things and decide what you can keep and toss the rest! 

 photo 6button_zpsff77ff79.png  


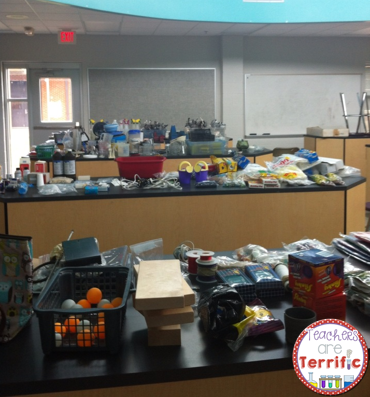
What you are seeing on those lab tables are the contents of all those cabinets. I emptied them, cleaned the shelves, and then organized the supplies. (How I organized all those supplies would take another entire blog post!)

Time to unpack! By now you will have decided where your areas are going to be, the shelves are clean, and you can go to the labeled boxes 
 and start unloading!   It’s so fun to start putting your personal things in their new homes!

DECORATE!  The space you have moved into may have bare walls and boards and you will have to start working on your chosen theme. Here’s a great idea for bulletin boards- PAINT THEM!

 photo 7button_zpsf883eba0.png


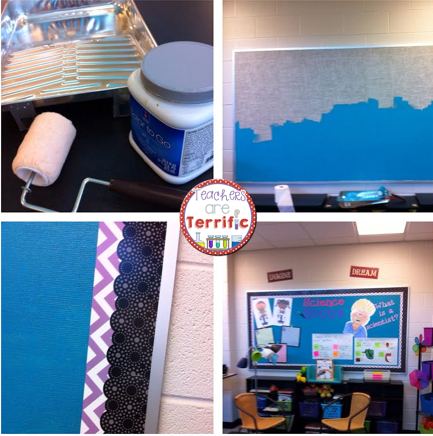
 It’s easy to do and keeps you from having to cover them every year.

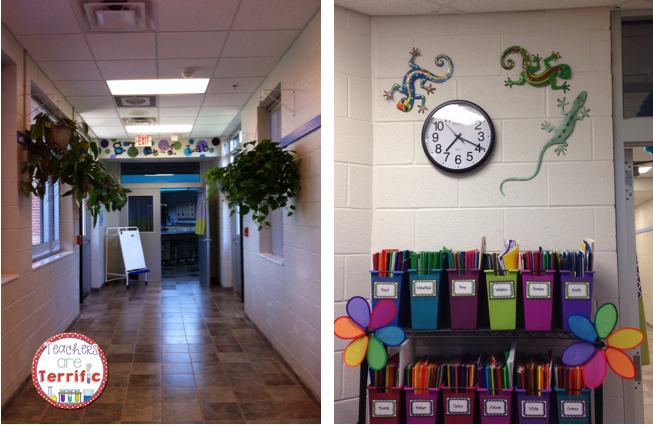
ADD YOUR PERSONALITY! Add some personal touches and the new space is yours!

 photo 8button_zpsdb81cd30.png 


If you are moving your classroom I wish you the best. Just know it takes time! Take the time to do it! Organize as you put things away. You'll be glad later that you did!

If you are setting up a classroom for the first time I have some advice for you! Recently I had a conversation with a large group of teachers and we put together a list of all those really weird things that teachers accumulate over the years. These are things we actually use occasionally and we know we need. I compiled a master list of all those items and you can get it *FREE* by clicking on the thumbnail below! You can also click {HERE}!

 photo 41ad33c4-264c-4a83-8bc6-94388181a3e7_zps36e29946.jpg


Thanks so much Stephanie for giving me this great opportunity to guest blog for you!
post signature


Hi Friends!

My name is Melissa from Mrs. Dailey's Classroom and I am thrilled to be guest blogging for Stephanie while she is away. Like Stephanie, I teach second grade so the Learning Chambers is on my list of top blogs to visit weekly. 

Today I'll be sharing my secrets on moving your classroom whether your switching rooms, moving to a different grade level, or transitioning to a different school. I think many of us can be guilty of putting organization off until the last minute because we want to cherish those final moments with our students. That's why I'd like to share 5 organizational tips that will help you when venturing off to your new classroom.

Before we get started, I'd like to share a set of free word wall labels that will help you set up your new classroom word wall. You can find it on my TpT store here. 


Here we go!

Tip 1: Purge Before Packing
This does not mean throw away those wonderful resources! Before teaching second grade, I taught kindergarten for four years. As I packed to move into a new classroom, I gave away some of my younger materials to other teachers so that they could use them. Many of my fellow teachers have also done this for me... It's the life cycle of educational materials!

Tip 2: Level Your Books
Leveling your books takes a long time and can be challenging as your trying to move! If your pressed for time, you can ask a parent to come in to use Scholastic's Book Wizard to help you. 


Have the parent separate the books by level by placing them in bins for you! It is such a time saver and this can be a money free way that parents can contribute to the classroom! 

Tip 3: Take Photos of Your Room
Do you have certain areas of your room that you L.O.V.E.? I bet the answer is yes! When you in the midst of unpacking boxes photographs can put your mind at easy and give you a visual of your old but beloved classroom.

Tip 4: Neatly File in Boxes
Moving to a new room really motivated me to get my files in order. During the school year I would stick things in files and set them in my filing cabinet but when I knew I'd be moving down the hallway, I was able to get myself better organized! 

I suggest  taking a few boxes and putting your files in order in those boxes so that you can easily place them in your new filing cabinet. 

Tip 5: Label a Box "Desk"
This last tip is my favorite and in my opinion, essential. Having one box labeled "Desk" will be easy for you to find so that you can put your materials away quickly. Even if your classroom still needs a few finishing touches during Back to School Week, you'll at least have your desk essentials neatly put away. 

Remember that moving to another classroom is a new journey in your career. While it can seem overwhelming, make sure that you remember this time can be exciting! You're moving into a new room and will make new memories with your new students! 

I loved guest blogging and would like to stay in touch with all of you fabulous teachers! I would love if you would follow me on Facebook, my blog, Mrs. Dailey's Classroom to continue our meaningful conversations, and over at TpT to grab more free resources as they are updated weekly! Right now the blog is being created but will be up and running mid-July. I hope you have a great summer and settle into your classrooms nicely this fall! 

Sincerely,
Melissa


Back to Top